 Automation-friendly framework for Continuous Testing


 Automation-friendly framework for Continuous Testing
How to Quickly and Easily Write Selenium Scripts on TaurusAuthor: Yulia Shepeleva Load testing web applications has become common practice, with open-source Apache JMeter being the most popular load testing tool. JMeter works with different protocols, including HTTP. However, due to its nature, JMeter is not able to perform all browser-supported actions, and it also doesn't execute the javascript found in the HTML page. Therefore, we need a tool that can operate on a user interface level of a real browser window. The solution is Selenium WebDriver. However, Selenium's technology requires you write the script in one of the supported programing languages, and this might be difficult for users without a technical background. The solution is to use Selenium with Taurus DSL, which provides a simplification for user web page level scripting, with the concept of 'simple UI actions'. Taurus uses simple configuration files in YAML format. Through them, Taurus takes the list of user interface actions, translates them into program code that uses Selenium and also executes the generated script. In this article we will demonstrate how to build a simple YAML script, which describes actions performed by a user on a web page. Then, we will reuse this scenario for load testing. Step 1. Creating a Simple YAML ScriptLet's create a simple script for one page in the Chrome browser in YAML. What we need to begin to work:
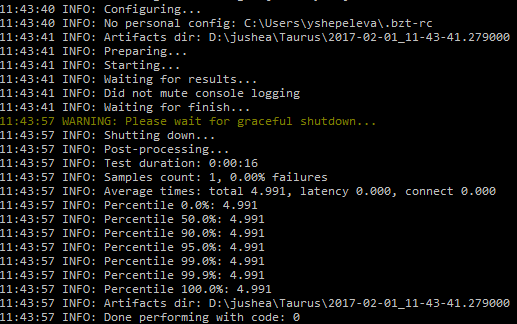
execution: - executor: selenium scenario: open_page scenarios: open_page: browser: Chrome timeout: 10s think-time: 3s requests: - url: http://blazedemo.com This script, which is a simple GET request, will be performed as a Selenium test in Chrome. It will load the first page of our demo site http://blazedemo.com. timeout - global scenario timeout for connecting, receiving results, 30 seconds by default, notice we changed it to 10s. think-time - global scenario delay between each request browser - displays which browsers support our script implementation. It's possible to use it in Chrome, Firefox, Ie and Opera. Now run the script with command-line: bzt load_page.yml The Taurus Console displays the execution of this one test:
The results of the test are displayed in the console the by default. If you want to see the testing process in detail you can look it up in the artifacts directory. The artifacts directory is created in the same folder where the script was launched from. If you want your artifact directory to be created in another location, you can change the artifact directory route. Look here for more information about how this can be done. The name of the folder is created according to the format %Y-%m-%d_%H-%M-%S.%f. This folder stores some files that interest us:
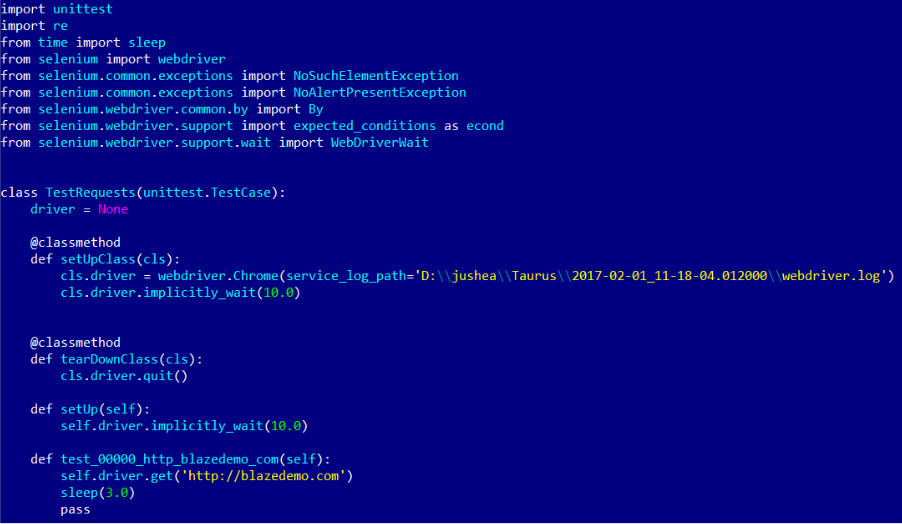
test_requests.py looks like this:
Step 2. Adding UI Actions for the WebpageNow, let's add actions that can be performed on the webpage we are testing. All actions on the page operate with WebElements, which correspond to any visual object on the page as well as to invisible objects on the page. For example, links, images, text fields, etc. Each element is described by an HTML tag, even though sometimes elements do not originate from HTML but from Javascript generated pieces of the DOM tree. To perform any actions on the element, the element first needs to be located on the page. One element can be described using different locators types. Let's take a look at the locators we are going to use and that support Selenium and Taurus: ID, Name, CSS, XPath. But first, we need to put the site address before the request in the script. Here we are looking at blazedemo.com: ... default-address: http://blazedemo.com requests: - url: /purchase.php To find the locators, open the HTML code of the page you are testing:
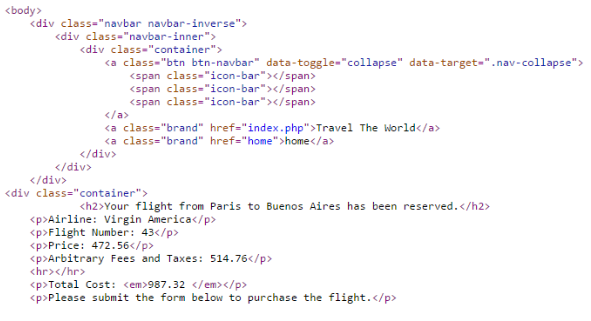
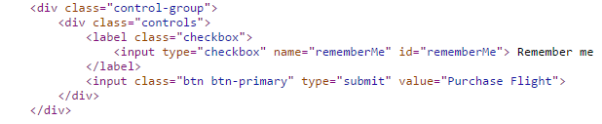
The Header is inside the tag <h2>. This tag is cannot be found anywhere else in the source of the page we work with. So, we need to grab the element by this tag. Add the visible option to the selector in your script to validate the found element actually displayed on the page. ... actions: - waitByCSS(h2): visible If we fill out the fields of the form on blazedemo.com, we get this HTML:
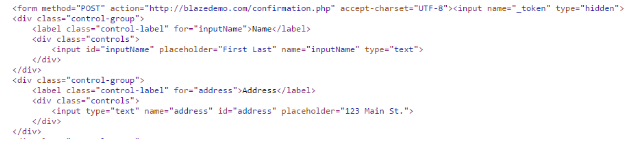
The text field Name has the attribute ID (id="inputName"), so Use this locator in the script to find this Input. This ID is unique on this webpage.
Click on the submit button on the blazedemo webpage:
This button has attribute CLASS (class="btn btn-primary") and this class is unique on this page. So, we can use the CSS selector and add it to the script.
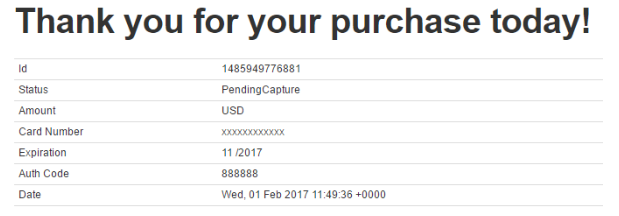
Go to the webpage itself page and validate the page contents.
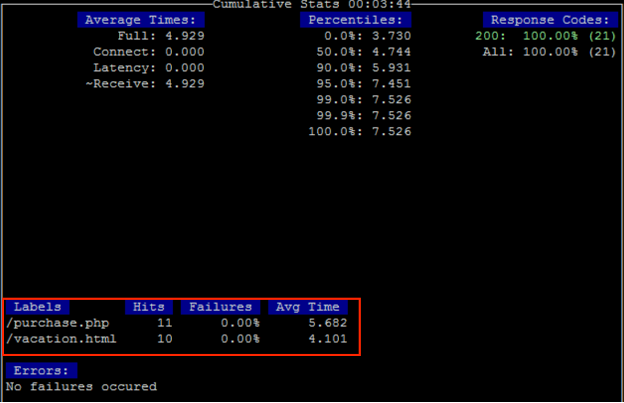
Add an assertion to the script: ... assert: - contains: - 'Thank you for your purchase today!' Here is our complete script code: execution: - executor: selenium scenario: open_page scenarios: open_page: browser: Chrome timeout: 10s think-time: 3s default-address: http://blazedemo.com requests: - url: /purchase.php actions: - waitByCSS(h2): visible - keysByID(inputName): MyName - clickByCSS(.btn.btn-primary) assert: - contains: - 'Thank you for your purchase today!' Now, we've written one test, which can be run once. See full command reference here. Step 3: Measuring Multiple Stages in Your ScriptTaurus can measure the different stages of your test as separate KPIs. So let's add a new part to the script, which loads a page with a large image. scenarios: open_page: browser: Chrome timeout: 10s think-time: 3s default-address: http://blazedemo.com requests: - url: /purchase.php actions: - waitByCSS(h2): visible - keysByID(inputName): MyName - clickByCSS(.btn.btn-primary) assert: - contains: - 'Thank you for your purchase today!' - url: /vacation.html actions: - waitByCSS(div.container img): visible Run bzt config.yml The Taurus Console displays the execution and measurements of both stages:
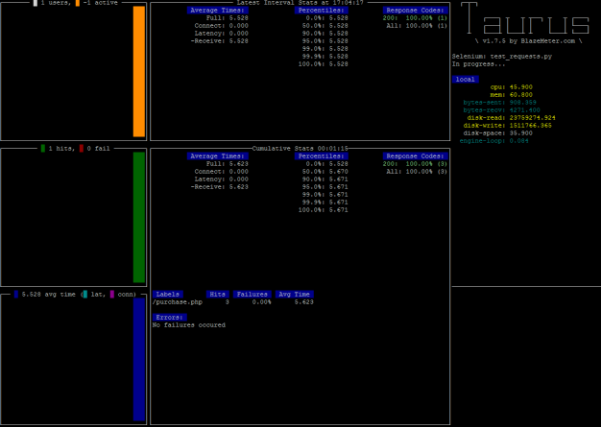
We can see the different KPIs for each stage. Step 4. Adding the Load Steps to the TestNow we will add some load parameters to the script. Concurrency: 5 concurrent users Ramp-up time: 2 minutes Time to hold the load: 5 minutes Set: execution: - executor: selenium scenario: open_page concurrency: 5 ramp-up: 2m hold-for: 5m scenarios: open_page: browser: Chrome timeout: 10s think-time: 3s default-address: http://blazedemo.com requests: - url: /purchase.php actions: - waitByCSS(h2): visible - keysByID(inputName): MyName - clickByCSS(.btn.btn-primary) assert: - contains: - 'Thank you for your purchase today!' Run by typing `bzt -cloud load_page.yml`
Now we have a load script that is loaded by default in the local environment. The Concurrency Option will work in the Blazemeter Cloud. To get instructions on how to adjust settings of execution in the cloud, please, see here. BlazeMeter also enables you to view rich reports that analyze KPIs and monitor system health. Congratulations! You can now write and run webpage load scripts by using an expression of actions through your YAML file. Taurus can also be integrated with Jenkins, for continuous integration purposes. To get a BlazeMeter demo, click here. |
On this page:
|